Your support helps keep this blog running! Secure payments via Paypal and Stripe.
To test email features on my localhost, I usually set up either a Gmail SMTP account or a sandbox mail service like Mailtrap. Both methods are reliable and easy to configure. In this guide, I’ll show you how to set up your WAMP environment to send emails using Gmail’s SMTP or safely test them with a sandbox mail service.
Key Takeaways
- You can use Gmail’s SMTP and a local Sendmail setup to send email from WAMP (localhost).
- Because Gmail requires two-factor authentication, you cannot use your regular password. You must generate an App Password for SMTP.
- In your WAMP’s
php.ini, you must configuresendmail_pathand SMTP settings to point to your Sendmail executable. - If sending fails, inspect
sendmail’serror.log(e.g., for “BadCredentials”) and recheck credentials or permissions. - A safer, easier method for testing is using a mail trap/sandbox service (e.g., Mailtrap.io) that captures outgoing emails without delivering them to real recipients.
- For WordPress development, using a plugin like Post SMTP often simplifies configuration, offers email logs, and improves reliability.
- Always check the spam or junk folder during testing, since test emails frequently get filtered.
- Testing email in a local environment is essential; choose between the SMTP setup or the Mailtrap approach based on your comfort level.
Sending Email via Gmail Account from WAMP
What do we need:
- Gmail account (Free or Paid account will work)
- Sendmail: a small program for the Windows operating system. A download file is provided below.
Step 1: Install Sendmail
- Download Sendmail: Download the
sendmail.zipfile from the provided link. No virus or malware in it. - Put it in WAMP: Unzip the file and copy the
sendmailfolder into your WAMP directory (for example, the WAMP folder isC:\wamp64). It should be “C:\wamp64\sendmail“. - Edit the
sendmail.inifile: Inside thesendmailfolder, open thesendmail.inifile. This is where you’ll tell it to use Gmail. You need to change a few things:- SMTP server: Make sure it says
smtp.gmail.com. - Port: Use
587. - Username and Password: Enter your Gmail email address and a special Gmail password (See Step 2 to see how to get one). Below is what the setting looks like.
- SMTP server: Make sure it says
smtp_server=smtp.gmail.com
smtp_port=587
auth_username=your_username
auth_password=your_password
Step 2: Get a Special Gmail Password
Two-factor authentication on the Google Account
Google recently forced you to enable “Two-factor authentication” on your Google account. If you have this turned on, you can’t use your regular password to set up sendmail.ini. Instead, you need a special “app password.” This is a 16-character password you create just for this purpose. You’ll use this new password in the auth_password line of your sendmail.ini file.
How to create that special password from your Google account.
- Create an “App Password”: Go into your Google account’s security settings. You’ll need to create a special 16-character password just for
Sendmail. This is called an “app password.” - Use the new password: Put this brand-new 16-character password into the
auth_passwordfield in thesendmail.inifile.
Step 3: Tell PHP to Use Sendmail
- Open
php.ini: In WAMP, click the WAMP icon, go to “PHP,” then click onphp.ini(C:\wamp64\bin\apache\apache2.4.59\bin\php.ini). - Change the settings: In this file, you need to tell PHP where to find the
sendmailprogram. You’ll set the SMTP server and the path to wheresendmail.exeit is located. See the setting below. - Save and Restart: Save both files (
sendmail.iniandphp.ini) and then restart all WAMP services.
[mail function]
SMTP=smtp.gmail.com
smtp_port=587
sendmail_path ="C:\wamp64\sendmail\sendmail.exe"
sendmail_from ="yourmail@gmail.com"
Note
SMTP and smtp_port settings in php.ini are the same as we set in sendmail.ini in Step 1.
Step 4: Test it Out!
- Create a PHP file: In your
wwwfolder, make a simple PHP file with the code provided in the article. - Run it in your browser: Go to
localhost/your_file_name.php. If it says “Success” and you see the new test email in your target email, the mail settings are working.
PHP Script to Send Email
<?php
/**
 * PHP Script to Send Test Email
 */
$to      = 'YourReadEmailAdddress';
$subject = 'the subject';
$message = 'hello';
$headers = 'From: webmaster@example.com' . "\r\n" .
    'Reply-To: webmaster@example.com' . "\r\n" .
    'X-Mailer: PHP/' . phpversion();

$result = mail($to, $subject, $message, $headers);
if( $result ) {
   echo 'Success';
}else{
   echo 'Fail';
}
?>
Fail: Can not send an email via Gmail account?
If the result is “Fail“, you should check the error log file in the sendmail folder.
“c:\wamp64\sendmail\error.log”. If it mentions common errors like “BadCredentials” or “Two-factor authentication”, it means you need to recheck your username and that special password you created.
Error: BadCredentials or Username and Password not accepted issue
In 2018, I got the error saying “Username and Password not accepted” and something about “BadCredentials“. You may also receive the critical security alert email. The alert email is “Sign-in attempt was blocked“.
In my solution at that time, I had to enable “Less secure app access” from my Gmail account. To enable it, simply go to Settings>Accounts and Import>Other Google Account settings. Then, under Security, look for “Less secure app access“. Then just turn on access.
Important note
Once you are done testing the email for your project, you should turn off access for security.
Two-factor authentication issue
If your Google account enables “Two-factor authentication“, you may receive the error that says “Application-specific password required” in your error log file that can be found in the sendmail folder. To fix it, just follow this internal link here.
The Easiest Way: Use a “Mail Trap” Service (Sanbox Mail Service)
This is the best method for testing since Gmail has more settings now. A mail trap is a service that catches all your test emails so you can see how they look right, without actually sending them to anyone. It’s like a secret testing inbox. The most popular one is Mailtrap.io.
- Once you sign up, you will see the inboxes page.

- Click on the Demo box or gear icon under the Action column, and you will see the messages page.
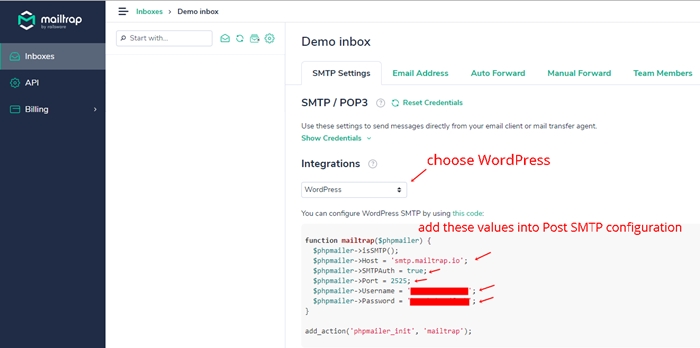
- On this page, you will see the SMTP settings tab. Under the Integrations section, choose WordPress. You will see the WordPress SMTP configuration below.
function mailtrap($phpmailer) {
  $phpmailer->isSMTP();
  $phpmailer->Host = 'smtp.mailtrap.io';
  $phpmailer->SMTPAuth = true;
  $phpmailer->Port = 2525;
  $phpmailer->Username = '11111111111111';
  $phpmailer->Password = '11111111111111';
}
add_action('phpmailer_init', 'mailtrap');- Now, you can use the SMTP configuration from MailTrap to replace the Gmail SMTP settings in sendmail.ini and php.ini. (Step 1 and Step 3 from the Gmail method section)
- To replace the Gmail SMTP setting with the MailTrap SMTP setting in sendmail.ini. You will do as below.
smtp_server=smtp.mailtrap.io
smtp_port=2525
auth_username=11111111111111
auth_password=11111111111111- Restart your WAMP and perform the sending test email (Step 4 from the Gmail method section).
SSL is not available on this server.
If you can not send the email with Mailtrap, and you see the “SSL is not available on this server” in the sendmail error log file, you will set the smtp_ssl from auto to none in sendmail.ini as below.
smtp_ssl=none
Next, restart WAMP and perform the sending test email.
WordPress: use the Post SMTP plugin
For WordPress, you try to use Sendmail with both a Gmail account and MailTrap, but no luck. You can try the Post SMTP plugin instead.
The Post SMTP plugin is designed to be incredibly simple and easy to use. In just a couple of minutes, you can get your SMTP mail server configured and send a test email.
One of the best features is the email log. This is super helpful because it keeps a record of every email sent from your site, making it easy to troubleshoot and figure out what went wrong if an email ever fails to send.
The plugin is also compatible with all major operating systems, including Windows, Mac, and Linux (Ubuntu), so you can use it no matter what your setup is.
Junk mail
Don’t forget to check your junk mail or spam folder after sending the test email. It’s common for these test messages to get filtered and land there instead of your main inbox.
Wrap up
Being able to test email functionality in your local development environment is crucial. Using a mail trap service like Mailtrap.io offers a straightforward and safe way to inspect your emails. While setting up a local SMTP server is an alternative, it’s generally more complex. Choose the method that best suits your needs and technical comfort level to ensure smooth email testing during your PHP and WordPress development with WAMP.
That’s it. If my post is useful and saves you time, please consider buying me a coffee today. 🙂
Your support helps keep this blog running! Secure payments via Paypal and Stripe.