Your support helps keep this blog running! Secure payments via Paypal and Stripe.
Recently I have been adding new features to my own application. I add new features using the module so I can disable and enable each module easily in the application configuration. The module is a self-contained software unit that contains models, controllers and views, and components. I prefer to use the Gii module to create the new module. I set up my application with the advanced template and I build my application in the frontend root.
Gii module URL(with enabling “pretty URL” in application configuration):
http://example.com/gii

Here are the steps I use
- Create Module by Gii
- Create Model by Gii
- Create CRUD by Gii
The module structure
let says I create the timesheet module.
Module
|- timesheet
|- controllers
|-DefaultController.php
|-models
|-TimeSheet.php
|-TimeSheetSearch.php
|-views
|-default
|-_form.php
|-_search.php
|-create.php
|-index.php
|-update.php
|-view.php
|-TimeSheet.php
Step 1: create a new module in Gii
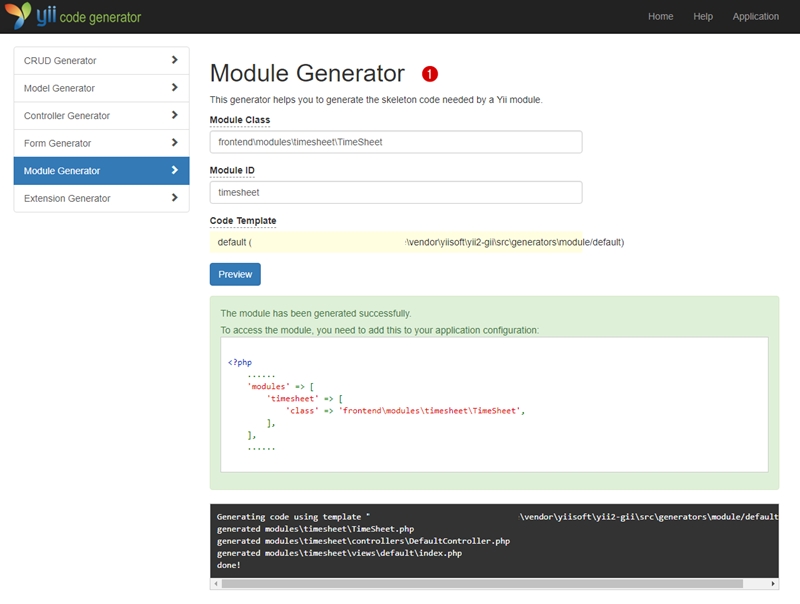
After the module is created, you need to enable the module by adding the new module class in the application configuration. Just like the green box message above. Notice that, you don’t have the model class yet. Let’s create one in the next step.
Step 2: create a new model by Gii
- Before creating a new model class, you need to have the actual table in the database first. Let’s create the new ma_timesheet table by Yii2 migration or you can manually create the table in PHPMyAdmin if you prefer. In my case, I like to create and maintain the database schema by Yii2 migration. In the terminal, I will add the migration command for creating the new migration file below.
./yii migrate/create create_new_timesheet_tableThen you can add the table structure in the new file where locates in “console/migrations/*.php“. More information about migration can be found here.
- Now you should have the ma_timesheet table in your database. Let’s create the model class for our new table by Gii.

Now you will see the new model class for the ma_timesheet table. Next step, we will create the controllers and views for the module by Gii. We will override the existing controllers and views that we already created by the module generator.
Step 3: create CRUD by Gii

Namespace error
If you get some error message regarding the namespace of the model class that your new table refers the key to(foreign keys I mean). You must add the namespace for that model class. Below are my new Timesheet model class and I add three foreign keys from the three tables which are Project, Task, and User.
Project and Task tables are created using the module and for all modules I create, I add them in “frontend\modules” path. So I add my namespace with “\frontend\modules\project\models\” and “\frontend\modules\task\models\”. But the User table I didn’t create as a module since it is the main table in my application so the namespace is “\frontend\models\”.
In the Yii2 framework, the namespace is very important.
<?php
    public function rules()
    {
        return [
            [['work_date', 'project_id', 'task_id', 'note', 'user_id', 'created_at'], 'required'],
            [['work_date', 'created_at', 'updated_at'], 'safe'],
            [['project_id', 'task_id', 'hours', 'user_id'], 'integer'],
            [['note'], 'string'],
            [['status'], 'string', 'max' => 10],
            [['project_id'], 'exist', 'skipOnError' => true, 'targetClass' => \frontend\modules\project\models\Project::className(), 'targetAttribute' => ['project_id' => 'id']],
            [['task_id'], 'exist', 'skipOnError' => true, 'targetClass' => \frontend\modules\task\models\Task::className(), 'targetAttribute' => ['task_id' => 'id']],
            [['user_id'], 'exist', 'skipOnError' => true, 'targetClass' => \frontend\models\User::className(), 'targetAttribute' => ['user_id' => 'id']],
        ];
    }
?>
That’s it.
Access the module
Now I can access my new timesheet module with this link:
or
Adjustment
You should edit each file we create in the modules folder to fit your needs.
Creating URLs when your application enables your modules
If your application disables your modules, you can use the URL helper to create the URL like below.
<?php
use yii\helpers\Url;

echo Url::to(['site/index']);
?>
If your application enables your modules just like my post, you must add the leading slash in front of the controller ID like below.
<?php
use yii\helpers\Url;

// add the leading slash in front of "site" which is the controller ID
echo Url::to(['/site/index']);
?>
If no leading slash is added, the module ID will be added before the controller ID automatically. See the sample below.
PHP:
echo Url::to(['/site/index']);output:
PHP:
echo Url::to(['site/index']);output:
Your support helps keep this blog running! Secure payments via Paypal and Stripe.

