Your support helps keep this blog running! Secure payments via Paypal and Stripe.
You know the bulk action and how it works. In WordPress, the bulk action is a part of the WordPress admin interface that allows you to select multiple records and do the action to all of them. It is handy when you want to update, for example, the status of the selected records at once. So that users won’t need to update one by one.
What we will use in this tutorial
- GridView widget is a data grid from Yii2. It takes data from a data provider and renders each row using a set of columns presenting data in the form of a table.
- Pjax widget is a widget from Yii2. It will trigger the Ajax request for you. Pjax widget is integrating the pjax jQuery plugin.
- HtmlHelpers, we will use the Html helper to generate the form for us.
- ArrayHelpers, we will use the Array helper to map the dropdown list on the form for us.
In my Yii2 app, I like to integrate Pjax into all GridView widgets. Because I don’t want to reload the whole page when I perform the data update, search, or pagination.
What is the result of this tutorial

The screenshot above shows the Bulk action form (1), the checkbox for the bulk action (2), and the GridView filter (3). We will set the Pjax scope that covers the Bulk action form and GridView widget. Meaning every link and form action within the Pjax scope will trigger the Ajax request.
Yii Debug Tool
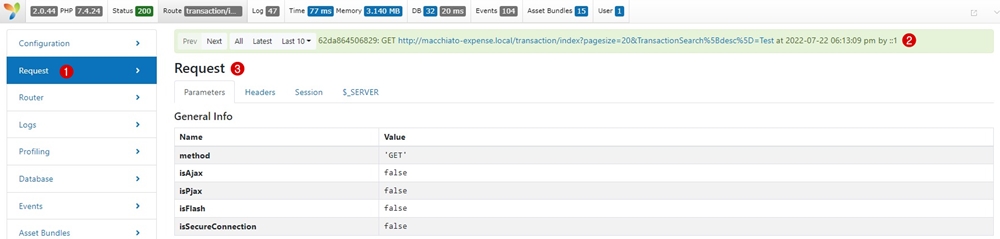
With Ajax’s request, you can debug the request by using the Yii debug tool. If you install the Yii2 basic template or advanced template, the Yii debug tool is included in the template. Below is what the Yii debug tool looks like.
Here is what we will do step by step
- add the classes (helpers and widgets) we need – views/index.php
- add Pjax scope – views/index.php
- create the bulk action form – views/index.php
- add the checkbox for bulk action in the GridView – views/index.php
- create the bulk action in the controllers – controllers/DefaultController.php
Add the classes (helpers and widgets) we need
First, we will tell Yii to load the helpers and widgets we need. At the top of the file, we will add Html helpers, ArrayHelper helper, GridView widget, and Pjax widget. If your view file already has them, you don’t need to add them again.
<?php

use yii\helpers\Html;
use yii\helpers\ArrayHelper;
use yii\grid\GridView;
use yii\widgets\Pjax;
...
Add Pjax scope
As I mentioned earlier, we will set the Pjax scope for the bulk action form and GridView widget. To do that, we simply add the Pjax::begin() and Pjax:end() to wrap the bulk action form and GridView widget. Simply like that.
Using GridView with Pjax
Here is an example of what the Pjax scope looks like when used with the GridView widget.
<?php
use yii\widgets\Pjax;
use yii\grid\GridView;

Pjax::begin([
    // PJax options
]);
    Gridview::widget([
        // GridView options
    ]);
Pjax::end();
More detail on how to use GridView with Pjax.
For our tutorial, the Pjax scope will look like this.
<!-- Pjax: START -->
<?php Pjax::begin([
   'id' => 'pjax-container',   // set Pjax ID is an option. No need if on your page uses only one Pjax scope.
   'timeout' => '5000',  // set Pjax timeout is an option. No need if on your page uses only one Pjax scope.
]); ?>

    <!-- bulk action form: START -->
    <?= Html::beginForm(['bulk'],'post',
    [
      'id' => 'bulk-action-transaction', // set Form ID is an option.
      'data-pjax' => 1,  // enable Pjax for this form so the page will do the action and reload after the action finishes.
      'class' => 'form-horizontal'  // set classname is an option.
    ]); ?>
    <!-- bulk action form fields -->
    // form fields are here

           <!-- GridView: START -->
           <?= Gridview::widget([
             // GridView options
           ]); ?>
           <!-- GridView: END -->

    <!-- bulk action form: END -->
    <?= Html::endForm();?>

<!-- Pjax: END -->
<?php Pjax::end(); ?>
Create the bulk action form
From the code above, we add the form Html helper(Html::beginForm) to generate the form. But we don’t add any fields we want yet. We will add two dropdown lists and one submit button for the form. Below is the code for these fields.
    <!-- bulk action form: START -->
    <?= Html::beginForm(['bulk'],'post',
    [
      'id' => 'bulk-action-transaction', // set Form ID is an option.
      'data-pjax' => 1,  // enable Pjax for this form so the page will do the action and reload after the action finishes.
      'class' => 'form-horizontal'  // set classname is an option.
    ]); ?>
                <!-- bulk action form fields -->
                <div class="form-group bg-info" style="margin: 0 0 5px 0; padding: 15px 5px;">
                    <?= Html::label('Income Owner','income_owner_bulk', ['class' => 'col-sm-2 control-label']) ?>
                    <div class="col-sm-3">
                        <?= Html::dropDownList('income_owner_bulk', '',
                            ArrayHelper::merge( [''=>'--select--'], Transaction::getOwnerStatus() ),
                            [
                                'class' => 'dropdown form-control'
                            ])
                        ?>
                    </div>
                    <?= Html::label('Expense Owner','expense_owner_bulk', ['class' => 'col-sm-2 control-label']) ?>
                    <div class="col-sm-3">
                        <?= Html::dropDownList('expense_owner_bulk', '',
                            ArrayHelper::merge( [''=>'--select--'], Transaction::getOwnerStatus() ),
                            [
                                'class' => 'dropdown form-control'
                            ])
                        ?>
                    </div>
                    <div class="col-sm-2">
                        <?= Html::submitButton('Bulk Update', ['class' => 'btn bg-green btn-flat', 'id' => 'bulk-action-btn']); ?>
                    </div>
                </div>
So we add the Income Owner dropdown list, Expense Owner dropdown list, and Bulk update button. The items in the dropdown list come from one of the methods in my model. It is just an array. You can just feed the static array instead of calling the method from the model like me.
Notice that, the action attribute of the form (Html::beginForm) is set as “bulk” and the method attribute is set as “post”. These settings tell you that we will create the new bulk action in our controller later.
Add the checkbox for bulk action in the GridView
Next, we will add the checkbox field for the bulk action in the GridView. To do that, in grid view widget, we add ‘class’=> ‘yii\grid\CheckboxColumn‘ and ‘cssClass’ => ‘check’ into the columns GridView options. The cssClass with the check value will allow the users to be able to select all checkboxes or unselect all checkboxes from the grid view as shown below.
<!-- GridView: START -->
<?= GridView::widget([
...
    'columns' => [
         [
              'class' => 'yii\grid\CheckboxColumn',
              'cssClass' => 'check'  // must add 'cssClass' for select all or unselect all
         ],
         ['class' => 'yii\grid\SerialColumn'],
         ...
Create the bulk action in the controllers
Lastly, we need to create new bulk action in our controllers. As I mentioned above, the bulk action form sets the action attribute to “bulk”. When you inspect the form using the browser inspection, you will see something like this.
<form id="bulk-action-transaction" class="form-horizontal" action="/bulk" method="post" data-pjax="1">
...
</form>
Meaning when users click on the submit button, the request will send the form data to “bulk” action.
Below is our actionBulk function code in our controllers file.
<?php

use yii\web\Response;
use frontend\models\Transaction;  // Transaction table is my table in this tutorial.
use frontend\models\TransactionSearch;  // TransactionSearch is my filter form of  GridView.
...

public function actionBulk(){
        // # debug the POST variable
        // var_dump(Yii::$app->request->post());
        // exit;

        // ---------- # get $_POST ------------
        $income_owner_bulk = Yii::$app->request->post('income_owner_bulk');
        $expense_owner_bulk = Yii::$app->request->post('expense_owner_bulk');
        $selection = (array)Yii::$app->request->post('selection'); // the selected primary IDs from the grid view. you can inspect at data-key attribute on the TR tag.

        // var_dump($selection);
        // The $selection value may be different based on the primary keys of your table. In this tutorial, my table have five primary keys.
        // The output of the selected primary key value in $selection array:
        //   0 => string '{"id":4360,"ma_category_id":72,"ma_account_id":15,"ma_currency_id":294,"ma_user_id":1}' (length=86)
        //   1 => string '{"id":4359,"ma_category_id":72,"ma_account_id":15,"ma_currency_id":294,"ma_user_id":1}' (length=86)


        // ----------- # GridView filter form -------------
        $filter = Yii::$app->request->post('TransactionSearch');  // My filter form field uses "TransactionSearch". Yours will be difference. You need to inspect the HTML code by browser inspection tool to see yours.
        if( isset($filter) && is_array($filter) && count($filter)>0 && count($selection)==0 )
        {
            // create the param array for adding in the redirect method
            $param = [];
            foreach($filter as $key => $value)
            {
                // create the param array only for the filter fields that are not empty.
                if ( strlen($value) > 0 )
                    $param[$key] = $value;
            }

            // redirect the page back to the index including the query param.
            // https://www.yiiframework.com/doc/api/2.0/yii-web-controller#redirect%28%29-detail
            return $this->redirect( [
                'index',
                'TransactionSearch' => $param
            ] );
        }


        // ----------- # update the transaction owner following the bulk action --------------
        // $selection contains all primary key values that users select from the grid view widget
        if(is_array($selection) && count($selection)>0)
        {
            // # get only primary key list
            // get only the ID field of transaction records in order to query the data using find()
            $selectedRecords = [];
            foreach($selection as $value) {
                // convert string to object using json_decode()
                $selectedRecords[] = json_decode($value)->id;
            }

            // # fetch only the selected records
            // your table will perform the query based on your criteria.
            // my table in this tutorial just need only ID field value.
            $transactions = Transaction::find()->where(
                [
                    'id'=>$selectedRecords
                ]
                )->all();

            // # update data
            // my table in this tutorial just need to be updated two fields.
            // in your case,you can perform anything you want with your table instead.
            if(is_array($transactions) && count($transactions)>0) {
                foreach($transactions as $transaction) {
                    if( strlen($income_owner_bulk) > 0 ) {
                        $transaction->income_owner = $income_owner_bulk;
                    }
                    if( strlen($expense_owner_bulk) > 0 ) {
                        $transaction->expense_owner = $expense_owner_bulk;
                    }

                    $transaction->updated_at = date('Y-m-d');
                    $transaction->save();
                }
            }
        }

        return $this->redirect(['index']);
    }
...
In our controllers file, we add a new function called “actionBulk“. In the new function, we get the form data via “yii\web\Response“class ( Yii::$app->request->post() ). Basically, we get the “income_owner_bulk” dropdown value, “expense_owner_bulk” dropdown value, and the selected records array.
Because we add the Pjax scope for the bulk action form and the GridView widget is inside the bulk action form. That means the GridView widget will trigger Ajax requests as same as the bulk action form. So when users type any value in the filter form of GridView or users tick the bulk checkbox of GridView and then hit the “Bulk Update” button, the request will go to the bulk action (the actionBulk function in the controllers file). This is why you see the code in the actionBulk function will redirect along with the parameters and another one will redirect to the view file without any parameters.
Wrap up
The bulk action is very handy. Most of my clients request this feature when they are working on transactions. Hope my post is helpful and saves your developing time. If it does, please consider buying me a coffee. It will keep me motivated and publish more useful posts. And that’s it for today.
Your support helps keep this blog running! Secure payments via Paypal and Stripe.

