Your support helps keep this blog running! Secure payments via Paypal and Stripe.
If you work for your clients’ online store, sometimes you will get the request to add some extra fields on the Checkout page. The extra fields also need to display on the Order Received page (Thank you page), Email notification, View Order page from the My Account page, and Admin Order Edit page.
The extra fields may be the delivery date, pickup time, house number, gift card message, and so on. Today, we will look at how to add a House Number field to the billing and shipping addresses. Also, the house number field can be editable on the admin order edit page. Let’s do it!
You are not a developer
If you are not a developer and would like to add the extra fields to the Checkout page without any trouble, please check How to add custom fields to checkout page in WooCommerce with plugins.
Edit or Remove the Default Checkout Fields from the Checkout Page
A List of the Default Checkout Fields
By default, WooCommerce provides the default checkout fields as shown below.

Customize look and feel on the Checkout page
Basically, you want to inspect the checkout page and find classes or IDs that you can use to customize the visual design. You can inspect the webpage by opening the developer tools from your browser. You will use CSS to set the style you want via a child theme or WordPress Customizer at the WordPress backend.If you want to change the checkout template, you will need to edit the checkout template files from WooCommerce. The template structure can be found at plugins/woocommerce/templates. In this tutorial, we don’t focus on visual design; I just want you to know what you can do. Let’s move on.
Remove the Default Checkout Fields
To remove the default checkout fields, we will add the code snippet via functions.php or your own plugin. In general, I like to add the code snippet to my own plugin. This way, I can disable or enable my customization if my clients need it easily, and it won’t break any current site.
Remove the Order Note Field from the Checkout page
Below is the code snippet for removing the Order Note field from the Checkout page. The Order Note field is one of the default checkout fields from WooCommerce.
/**
 * ## remove order note field
 */
// Hook in
add_filter( 'woocommerce_checkout_fields' , 'custom_override_checkout_fields' );

// Our hooked in function - $fields is passed via the filter!
function custom_override_checkout_fields( $fields ) {
   unset($fields['order']['order_comments']);

   return $fields;
}

// Useful link:
// https://docs.woocommerce.com/document/tutorial-customising-checkout-fields-using-actions-and-filters/#section-2Explanation:
To remove the default checkout fields, we will use “woocommerce_checkout_fields” hook. We pass $fields to the callback function and remove the unwanted fields from the $fields array. Then we return the $fields back. It is simple and straightforward.
Remove all Possible Default Checkout Fields from the Checkout page
Below is the code snippet to remove all default checkout fields.
/**
 * ## Remove all default checkout fields
 */
function custom_override_checkout_fields( $fields ) {
     // Billing section
     unset( $fields['billing']['billing_first_name'] );
     unset( $fields['billing']['billing_last_name'] );
     unset( $fields['billing']['billing_company'] );
     unset( $fields['billing']['billing_address_1'] );
     unset( $fields['billing']['billing_address_2'] );
     unset( $fields['billing']['billing_city'] );
     unset( $fields['billing']['billing_postcode'] );
     unset( $fields['billing']['billing_state'] );
     unset( $fields['billing']['billing_email'] );
     unset( $fields['billing']['billing_phone'] );

     // Shipping section
     unset( $fields['shipping']['shipping_first_name'] );
     unset( $fields['shipping']['shipping_last_name'] );
     unset( $fields['shipping']['shipping_company'] );
     unset( $fields['shipping']['shipping_address_1'] );
     unset( $fields['shipping']['shipping_address_2'] );
     unset( $fields['shipping']['shipping_city'] );
     unset( $fields['shipping']['shipping_postcode'] );
     unset( $fields['shipping']['shipping_country'] );
     unset( $fields['shipping']['shipping_state'] );

     // Order fields
     unset( $fields['order']['order_comments'] );

     return $fields;
 }
 add_filter( 'woocommerce_checkout_fields', 'custom_override_checkout_fields' );
The billing_country and shipping_country fields are required by WooCommerce. You should not remove this field.
Edit the Default Checkout Field Properties
Apart from removing the default checkout fields, you can edit the field properties as shown below.
type– type of field (text, textarea, password, select)label– label for the input fieldplaceholder– placeholder for the inputclass– class for the inputrequired– true or false, whether or not the field is requiredclear– true or false, applies a clear fix to the field/labellabel_class– class for the label elementoptions– for select boxes, an array of options (key => value pairs)
Since $fields is an array, you can simply edit the array value just like this.
// Hook in
 add_filter( 'woocommerce_checkout_fields' , 'custom_override_checkout_fields' );

// Our hooked in function - $fields is passed via the filter!
function custom_override_checkout_fields( $fields ) {
    $fields['order']['order_comments']['placeholder'] = _x('My New Placeholder', 'placeholder', 'woocommerce');
    $fields['order']['order_comments']['label'] = __('My New Label', 'woocommerce');

    return $fields;
}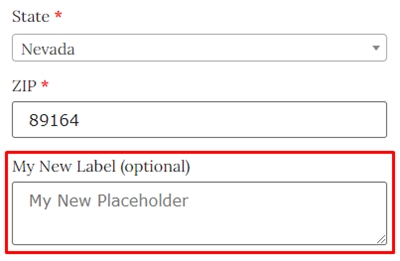
Explanation:
As code above, we change the placeholder and label of the Order Note field on the Checkout page. You can print out all properties from the $fields array to see how to access and assign the new value to other properties. Again, the code can be added via functions.php or your own plugin.
Add a House Number field(custom field) on the Checkout page
We will add a new house number to our checkout page. We will add this field to the billing and shipping addresses. Here is what our checkout form will look like.

After adding the house number field, we will see this field on
- Order Received page (Thank you page)
- Email notification
- View Order page at My Account
- Address page at My Account
- Order preview popup at admin order edit page (eye icon)
Moreover, we will make the editable custom field on the admin order edit page as well. Stay tuned!
Add New Custom Fields in the Checkout form on the Checkout page
// ## Billing address
// Add new custom field to billing address
add_filter( 'woocommerce_billing_fields', 'add_custom_billing_fields', 10, 1 );
function add_custom_billing_fields( $address_fields ) {

    // # print out the array to see the priority property of all fields so we can set the priority of our new house number correctly
    // echo '<pre>';
    // print_r($address_fields);
    // echo '</pre>';


    // # add new house number field to billing address
    //
    // For the billing fields, you must prepend "billing_" to your field name.
    // In this case, we define as $address_fields['billing_house_number'].
    $address_fields['billing_house_number'] = array(
        'label'     => __('House number', 'woocommerce'),
        'placeholder'   => _x('House Number', 'placeholder', 'woocommerce'),
        'required'  => true,
        'class'     => array('form-row-wide'), // Woocommerce provides "form-row-wide", "form-row-first" and "form-row-last" class for the field. "form-row-first" and "form-row-last" classes will make two fields align on one row side by side.
        'clear'     => true,
        'priority'  => 67  // add new house_number field before address_1 field. you may set a difference number. It depends on the priority attributes of $address_fields array.
     );

    return $address_fields;

}
// ## Shipping address
// Add new custom field to shipping address
add_filter( 'woocommerce_shipping_fields', 'add_custom_shipping_fields', 10, 1 );
function add_custom_shipping_fields( $address_fields ) {
// # print out the array to see the priority property of all fields so we can set the priority of our new house number correctly
// echo '<pre>';
// print_r($address_fields);
// echo '</pre>';
// # add new house number field to shipping address
// For shipping fields, you must prepend "shipping_" to your field name.
// In this case, we define as $address_fields['shipping_house_number'].
$address_fields['shipping_house_number'] = array(
'label' => __('House number', 'woocommerce'),
'placeholder' => _x('House Number', 'placeholder', 'woocommerce'),
'required' => true,
'class' => array('form-row-wide'),
'clear' => true,
'priority' => 67 // add new house_number field before address_1 field. you may set a difference number. It depends on the priority attributes of $address_fields array.
);
return $address_fields;
}Now you should see the new house number field on the checkout page, as shown below.
Display the Custom fields on the Order Received page(Thank you page), Email Notification, and Admin Order Edit Page
Adding the House Number to the Order Address (Billing and Shipping Addresses)
To display the billing address, WooCommerce will call get_formatted_billing_address function. Inside the get_formatted_billing_address function, it calls “woocommerce_order_formatted_billing_address” hook. So we will add the house number field to the billing address format via this hook.
// ## Billing address
add_filter( 'woocommerce_order_formatted_billing_address', 'woocommerce_order_formatted_billing_address' , 10, 2) ;
function woocommerce_order_formatted_billing_address( $fields, $order ) {

    // https://developer.wordpress.org/reference/functions/get_post_meta/
    // get_post_meta function uses to get the custom field value from database
    //
    // Notice that we are getting the custom field value by "_billing_house_number" with get_post_meta().
    // This is because Woocommerce stores the custom field name in database with an underscore in front of custom field name.
    $fields['house_number'] = get_post_meta($order->id, '_billing_house_number', true);

    return $fields;

}
Same reason as billing address, in get_formatted_shipping_address function, it calls “woocommerce_order_formatted_shipping_address” hook. We will add the house number field to the shipping address format via this hook.
// ## Shipping address
add_filter( 'woocommerce_order_formatted_shipping_address', 'woocommerce_order_formatted_shipping_address' , 10, 2 );
function woocommerce_order_formatted_shipping_address($fields, $order) {

    $fields['house_number'] = get_post_meta($order->id, '_shipping_house_number', true);

    return $fields;
}
After you submit the checkout form and checkout process is complete. You will see our house number field stores in the wp_postmeta table as below.

Adding House Number to Customer Address (Address section at My Account page)
When the checkout form is saved. We will have the order address and the customer address in the database. We have already added the house number field to the billing and shipping address for the order from the previous section. In this section, we will add the house number field to the customer address.
We will add the new custom field to the custom address via “woocommerce_my_account_my_address_formatted_address” hook.
// ## My Account > Addresses page
add_filter( 'woocommerce_my_account_my_address_formatted_address', 'woocommerce_my_account_my_address_formatted_address', 10, 3 );
function woocommerce_my_account_my_address_formatted_address( $args, $customer_id, $name ) {
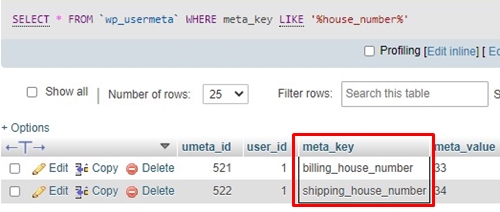
// The house_number is saved as billing_house_number and shipping_house_number in wp_usermeta table.
// we want to display the house number at address section on My Account page
$args['house_number'] = get_user_meta( $customer_id, $name . '_house_number', true );
return $args;
}You can find the house number field and value for users in the wp_usermeta table. You will see the records if your customer registers the new user on your website (depending on how you set up WooCommerce for creating a new user. You can create the new user automatically when the checkout page is complete).
Now we add the house number field to all address formats we want. Next, we will add the house number field to the preformatted address for all countries.
Update the Preformatted Address Template
WooCommerce provides the preformatted address template for all countries. We need to add our house number field to this template and then map the template with actual data. Without this step, our house number field won’t display on the pages we want, even though we add our house number into billing, shipping, and customer address format from the previous section.
Here is an example of a preformatted address for the USA. You will see field placeholders. These placeholders will be mapped with the actual data from the database.
$formats[ 'US' ] = "{name}\n{company}\n{address_1}\n{address_2}\n{city}, {state_code} {postcode}\n{country}";We will add our custom field placeholder into the preformatted address template via “woocommerce_localisation_address_formats” hook. Next, we will map our custom field placeholder with actual data via “woocommerce_formatted_address_replacements” hook.
Note
The billing_email and billing_phone are not included in the preformatted address. So on the admin order edit page, those two fields will be displayed under the address section.
Let’s say we want to add our house number to the Japanese address format only. And we will reorder the fields by putting the house number before the address_1 field. Below is the code snippet to achieve it.
add_filter( 'woocommerce_localisation_address_formats', 'woocommerce_localisation_address_formats_filter', 20 );
function woocommerce_localisation_address_formats_filter( $address_formats ) {

    foreach( $address_formats as $country_code => $address_format ) {

        // you can reorder the field placeholder from this address format.
        // below we want to display the house number above firstname and lastname fields for Japan only.
        if ( $country_code === 'JP' ) {

            // # print out the address format to see how Japan address template looks like.
            // echo '<pre>';
            // print_r($address_formats[$country_code]);
            // echo '</pre>';

            // # add our house number field before address_1 field
            // put a break("\n") then put custom field placeholder( {custom_field} ) for each country
            $address_formats[$country_code] = "{postcode}\n{state} {city} {house_number} {address_1}\n{address_2}\n{company}\n{last_name} {first_name}\n{country}";
            // # Now you will see the house number displaying in front of address_1 value on
            // - Order Received page(Thank you page)
            // - Email notification
            // - Address of My Account page
            // - View Order of My Account page
            // - admin order edit page
        }
    }

    return $address_formats;
}
You can add the house number field to preformatted address for all countries if you want. Also, you can reorder the field placeholder as you like.
Now, if you submit the checkout form and view the Order Received page(Thank you page), Email notification, or admin order edit page, you will see {house_number} in the billing and shipping address. This means the house number field placeholder is already added to the preformatted address.
Next, we will map the house number placeholder with actual data via “woocommerce_formatted_address_replacements” hook.
add_filter( 'woocommerce_formatted_address_replacements', 'woocommerce_formatted_address_replacements', 20, 2 );
function woocommerce_formatted_address_replacements( $fields, $args ) {

    foreach ( $args as $field_name => $field_value ) {
        if ( !isset( $fields['{' . $field_name . '}'] ) ) {
            $fields['{' . $field_name . '}'] = $field_value;
        }
    }

    return $fields;
}
Now, we check the Order Received page(Thank you page), Email notification, or admin order edit page again, and we will see the actual data shows up as screenshot below.

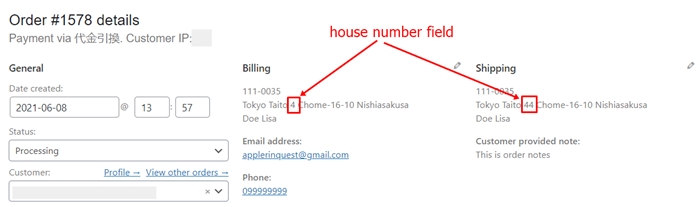
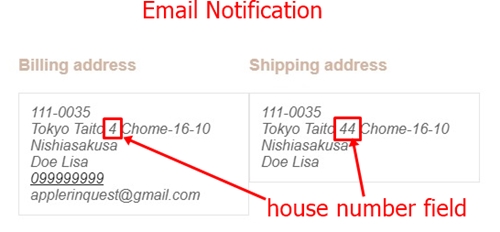
At this point, the house number field shows on the order address and customer address (My Account page).
On My Account page, customers can edit the address, including the house number, without any issue.

But on the admin order edit page, the house number field disappears on the edit address form. So next, we will make the house number field editable on the admin order edit page.
Add the Editable Custom Field in the Admin Order Edit Page
To do that, we will use “woocommerce_admin_billing_fields” hook and “woocommerce_admin_shipping_fields” hook. In these hooks, we will add the house number field along with a label and show attributes. With the help of these hooks, our house number field will show in edit mode and save to the database automatically.
You can read the usage of these hooks from WooCommerce plugin source code.
// ## Billing address - editable fields
add_filter( 'woocommerce_admin_billing_fields' , 'add_editable_billing_fields_in_order_edit_page' );
function add_editable_billing_fields_in_order_edit_page( $fields ) {

    // # print out $fields to see what fields will display on edit form
    // echo '<pre>';
    // print_r($fields);
    // echo '</pre>';

    // reorder fields after clicking on the pencil icon
    $tmp = array();
    foreach($fields as $field_name=>$attr) {

        // we want to show the house number input field after the company input field.
        if( $field_name === 'address_1' ) {
            $tmp['house_number'] = array(
                                        'label' => __('House Number','woocommerce'),
                                        'show' => false  // We hide this custom field on admin order edit page on view mode. When user clicks a pencil icon, this editable field will show up. If we set the show attribute as true, the custom field will be shown including the label as same as billing phone and billing email fields.
                                    );
        }

        $tmp[$field_name] = $attr;

    }
    $fields = $tmp;

    return $fields;
}
// ## Shipping address - editable fields
add_filter('woocommerce_admin_shipping_fields', 'add_editable_shipping_fields_in_order_edit_page');
function add_editable_shipping_fields_in_order_edit_page( $fields )
{
$tmp = array();
foreach($fields as $field_name=>$attr) {
// we want to show the house number input field after the company input field.
if( $field_name === 'address_1' ) {
$tmp['house_number'] = array(
'label' => __('House Number','woocommerce'),
'show' => false // We hide this custom field on admin order edit page. When user clicks a pencil icon, this editable field will show up. If we set the show attribute as true, the custom field will be shown including the label.
);
}
$tmp[$field_name] = $attr;
}
$fields = $tmp;
return $fields;
}Here is the result from our code snippet.
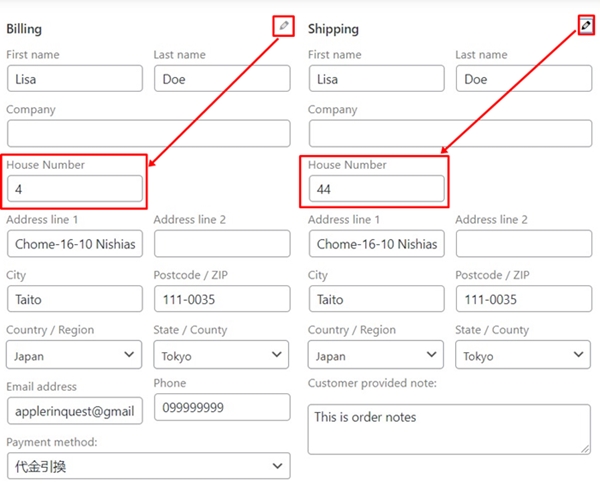
Full source code
/**
* Example to add a house number field to billing and shipping address on Checkout page.
* The checkout custom fields will..
* - display on Order Received page (Thank you page)
* - display on Email notification
* - display on View Order page at My Account>Orders
* - display on Customer Address page at My Account>Address
* - display on Order Preview popup on admin order edit page
* - be editable on admin order edit page
*/
// -------------------------------------------------------------
// # 1 - Add new custom fields in checkout form on Checkout page
// -------------------------------------------------------------
// ## Billing address
// Add new custom field to billing address
add_filter( 'woocommerce_billing_fields', 'add_custom_billing_fields', 10, 1 );
function add_custom_billing_fields( $address_fields ) {
// check priority of each field in order to set our custom field priority in position we want.
// echo '<pre>';
// print_r($address_fields);
// echo '</pre>';
// # add new house number field to billing address
//
// For billing fields, you must prepend "billing_" to your field name for $address_fields array.
// In this case, we define as $address_fields['billing_house_number'].
$address_fields['billing_house_number'] = array(
'label' => __('House number', 'woocommerce'),
'placeholder' => _x('House Number', 'placeholder', 'woocommerce'),
'required' => true,
'class' => array('form-row-wide'),
'clear' => true,
'priority' => 67 // add new house_number field before address_1 field. you may set a difference number so you must check the priority of all checkout fields.
);
return $address_fields;
}
// ## Shipping address
// Add new custom field to shipping address
add_filter( 'woocommerce_shipping_fields', 'add_custom_shipping_fields', 10, 1 );
function add_custom_shipping_fields( $address_fields ) {
// check priority of each field in order to set our custom field priority in position we want.
// echo '<pre>';
// print_r($address_fields);
// echo '</pre>';
// # add new house number field to shipping address
// For shipping fields, you must prepend "shipping_" to your field name for $address_fields array.
// In this case, we define as $address_fields['shipping_house_number'].
$address_fields['shipping_house_number'] = array(
'label' => __('House number', 'woocommerce'),
'placeholder' => _x('House Number', 'placeholder', 'woocommerce'),
'required' => true,
'class' => array('form-row-wide'),
'clear' => true,
'priority' => 67 // add new house_number field before address_1 field
);
return $address_fields;
}
// --------------------------------------------------------------------------------------------------------------------
// 2 - Display the custom fields on Order Received page(Thank you page), email notification, and admin order edit page.
// --------------------------------------------------------------------------------------------------------------------
// ## Billing address
add_filter( 'woocommerce_order_formatted_billing_address', 'woocommerce_order_formatted_billing_address' , 10, 2) ;
function woocommerce_order_formatted_billing_address( $fields, $order ) {
// Notice that we are getting the custom field value by "_billing_house_number" with get_post_meta().
// This is because Woocommerce stores the custom field name in database with an underscore in front of custom field name.
$fields['house_number'] = get_post_meta($order->id, '_billing_house_number', true);
return $fields;
}
// ## Shipping address
add_filter( 'woocommerce_order_formatted_shipping_address', 'woocommerce_order_formatted_shipping_address' , 10, 2 );
function woocommerce_order_formatted_shipping_address($fields, $order) {
$fields['house_number'] = get_post_meta($order->id, '_shipping_house_number', true);
return $fields;
}
// ## My Account > Addresses page
add_filter( 'woocommerce_my_account_my_address_formatted_address', 'woocommerce_my_account_my_address_formatted_address', 10, 3 );
function woocommerce_my_account_my_address_formatted_address( $args, $customer_id, $name ) {
// the house_number is saved as billing_house_number and shipping_house_number.
// we want to display the house number on address page of My Account page
$args['house_number'] = get_user_meta( $customer_id, $name . '_house_number', true );
return $args;
}
// --------------------------------------------------------------
// 3 - update the preformatted address template from Woocommerce
// --------------------------------------------------------------
// Note that, billing_email and billing_phone don't include in the preformat address from Woocommerce.
// On admin order edit page, those two fields will be displayed under the address section.
add_filter( 'woocommerce_localisation_address_formats', 'woocommerce_localisation_address_formats_filter', 20 );
add_filter( 'woocommerce_formatted_address_replacements', 'woocommerce_formatted_address_replacements', 20, 2 );
function woocommerce_localisation_address_formats_filter( $address_formats ) {
foreach( $address_formats as $country_code => $address_format ) {
// you can reorder the field placeholder from this address format.
// below we want to display the house number above firstname and lastname fields for Japan only.
if ( $country_code === 'JP' ) {
// # print out the address format to see how Japan address template looks like.
// echo '<pre>';
// print_r($address_formats[$country_code]);
// echo '</pre>';
// # add our house number field before address_1 field
// put a break("\n") then put custom field placeholder( {custom_field} ) for each country
$address_formats[$country_code] = "{postcode}\n{state} {city} {house_number} {address_1}\n{address_2}\n{company}\n{last_name} {first_name}\n{country}";
// # Now you will see the house number displaying in front of address_1 value on
// - Order Received page(Thank you page)
// - Email notification
// - Address of My Account page
// - View Order of My Account page
// - admin order edit page
}
}
return $address_formats;
}
function woocommerce_formatted_address_replacements( $fields, $args ) {
foreach ( $args as $field_name => $field_value ) {
if ( !isset( $fields['{' . $field_name . '}'] ) ) {
$fields['{' . $field_name . '}'] = $field_value;
}
}
return $fields;
}
// --------------------------------------------------------------
// 4 - add the editable custom field in admin order edit page
// --------------------------------------------------------------
// ## Billing address - editable fields
add_filter( 'woocommerce_admin_billing_fields' , 'add_editable_billing_fields_in_order_edit_page' );
function add_editable_billing_fields_in_order_edit_page( $fields ) {
// echo '<pre>';
// print_r($fields);
// echo '</pre>';
// reorder fields after clicking on the pencil icon
$tmp = array();
foreach($fields as $field_name=>$attr) {
// we want to show the house number input field after the company input field.
if( $field_name === 'address_1' ) {
$tmp['house_number'] = array(
'label' => __('House Number','woocommerce'),
'show' => false // We hide this custom field on admin order edit page. When user clicks a pencil icon, this editable field will show up. If we set the show attribute as true, the custom field will be shown including the label.
);
}
$tmp[$field_name] = $attr;
}
$fields = $tmp;
return $fields;
}
// ## Shipping address - editable fields
add_filter('woocommerce_admin_shipping_fields', 'add_editable_shipping_fields_in_order_edit_page');
function add_editable_shipping_fields_in_order_edit_page( $fields )
{
    $tmp = array();
    foreach($fields as $field_name=>$attr) {

        // we want to show the house number input field after the company input field.
        if( $field_name === 'address_1' ) {
            $tmp['house_number'] = array(
                                        'label' => __('House Number','woocommerce'),
                                        'show' => false  // We hide this custom field on admin order edit page. When user clicks a pencil icon, this editable field will show up. If we set the show attribute as true, the custom field will be shown including the label.
                                    );
        }

        $tmp[$field_name] = $attr;

    }
    $fields = $tmp;

    return $fields;
}And that’s it. We have the house number field, which is a custom field and displays in billing, shipping, and custom address. Plus, the custom field can be edited in the admin order edit page.
Useful WooCommerce documentation
- Customizing checkout fields using actions and filters
- Woocommerce hooks – Actions and filters
- Woocommerce hooks reference
- Extending
- Woocommerce plugin developer handbook
- Classes in WooCommerce
- Useful core functions
- Payment gateway api
Hope my tutorial will save you time and headache. It takes me a few days to prepare the tutorial. If you are happy with my effort, you may consider buying me some coffee. I am a coffee LOVER.
Your support helps keep this blog running! Secure payments via Paypal and Stripe.