Your support helps keep this blog running! Secure payments via Paypal and Stripe.
Good websites make things easy, especially when uploading files. My recent work was about making image uploading better by adding a feature that shows the user the final picture right away. When a user drags or chooses an image, the preview instantly shows them how it will look inside our design box (the card design). This simple step makes sure the user is happy with their choice before they click save. If you are a developer who wants to add this kind of smooth, helpful feature to your forms, keep reading. I will show you how to code this full Drag & Drop Uploader with a live look using clear and easy JavaScript.
Prerequisites
- Vanilla JavaScript (or Pure JavaScript)
- CSS
- HTML
- Dummy Image for preview testing (Source: Freepik)
- Bootstrap 5
- Font Awesome (for icons)
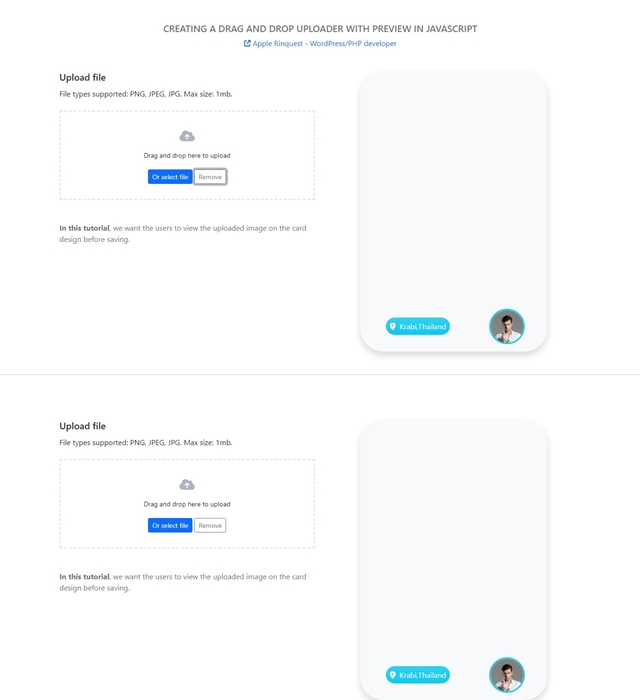
The Final Look
By the end of this post, the final will look like this.
Create an HTML file
First, we need to create an HTML file.
- Open your code editor. I use VSCode
- Copy the HTML code below and paste it into your index file (index.html)
<!DOCTYPE html>
<html lang="en">
<head>
<meta charset="UTF-8">
<meta http-equiv="X-UA-Compatible" content="IE=edge">
<meta name="viewport" content="width=device-width, initial-scale=1.0">
<title>File Drag and Drop with preview image in vanilla javascript by AppleRinquest.com</title>
<!-- add our custom style -->
<link rel="stylesheet" href="style.css">
<!-- using Bootstrap framework -->
<link href="https://cdn.jsdelivr.net/npm/bootstrap@5.0.2/dist/css/bootstrap.min.css" rel="stylesheet" integrity="sha384-EVSTQN3/azprG1Anm3QDgpJLIm9Nao0Yz1ztcQTwFspd3yD65VohhpuuCOmLASjC" crossorigin="anonymous">
<!-- using Font awesome framework -->
<link rel="stylesheet" href="https://cdnjs.cloudflare.com/ajax/libs/font-awesome/6.1.1/css/all.min.css" integrity="sha512-KfkfwYDsLkIlwQp6LFnl8zNdLGxu9YAA1QvwINks4PhcElQSvqcyVLLD9aMhXd13uQjoXtEKNosOWaZqXgel0g==" crossorigin="anonymous" referrerpolicy="no-referrer" />
</head>
<body>
<!--
NOTE:
The code based can use for the multiple uploaded image inputs.
Each uploaded image input will have its own preview image card.
In this code,
We refer the elements by classname in Javascript. We don't use the element Id.
-->
<!-- Title -->
<div class="container">
<div class="row">
<div class="col-12">
<div class="mt-5"></div>
<h3 class="h5 text-center text-secondary text-uppercase">Creating a drag and drop uploader with preview in Javascript</h3>
<a href="http://applerinquest.com" class="d-block text-center text-decoration-none"><i class="fa-solid fa-arrow-up-right-from-square"></i> Apple Rinquest - WordPress/PHP developer</a>
</div>
</div>
</div>
<!-- ### .preview-image-container | START ### -->
<div class="container preview-image-container">
<div class="row">
<div class="col-md-6">
<div class="mt-5"></div>
<h2 class="h5 mb-2 pb-1">Upload file</h2>
<p class="mb-4 fs-sm">File types supported: PNG, JPEG, JPG. Max size: 1mb.</p>
<!-- invalid message -->
<div class="invalid-feedback invalidFileSize" style="display:none;">The maximum file is 1mb. Please reduce the file size or change the new file.</div>
<div class="invalid-feedback invalidFileType" style="display:none;">Only PNG, JPEG and JPG file type are acceptable. Please choose the new file type.</div>
<!-- Drag and drop file upload -->
<div class="file-drop-area">
<div class="file-drop-icon"><i class="fa-solid fa-cloud-arrow-up"></i></div>
<span class="file-drop-message">Drag and drop here to upload</span>
<input type="file" class="file-drop-input" accept=".png, .jpg, .jpeg">
<button type="button" class="file-drop-btn btn btn-primary btn-sm">Or select file</button>
<button type="button" class="btn btn-outline-secondary btn-sm remove-upload-btn">Remove</button>
</div>
<!-- Note -->
<div class="mt-5 text-muted">
<span><b>In this tutorial</b>, we want the users to view the uploaded image on the card design before saving.</span>
</div>
</div>
<!-- preview image section -->
<aside class="col-md-6 mt-0 text-center">
<div class="mt-5"></div>
<!-- preview image card -->
<div class="card border-0 shadow bg-light d-inline-block" style="width: 400px; height: 600px; pointer-events: none; border-radius: 50px;">
<div class="d-flex align-items-end justify-content-start w-100 h-100">
<!-- preview image -->
<img src="" alt="" class="position-absolute top-0 preview-image" style="display: none; border-radius: 50px; width: 400px; height: 600px; object-fit: cover;">
<!-- extra info -->
<div class="d-flex justify-content-between align-items-center mb-3 mx-5 mt-5 position-relative" style="z-index:100;">
<div class="d-inline-block w-50">
<span class="text-white bg-info bg-gradient rounded-pill p-2 preview-image-title"><i class="fa-solid fa-location-dot"></i> Krabi,Thailand</span>
</div>
<div class="d-inline-block text-end w-50">
<img src="img/person-dummy.jpg" alt="https://www.freepik.com/drobotdean" class="rounded-circle w-50 border border-info border-3">
</div>
</div>
</div>
</div>
</aside>
</div>
</div>
<!-- ### .preview-image-container | END ### -->
<div class="my-5 border-1 border"></div>
<!-- ### .preview-image-container | START ### -->
<div class="container preview-image-container">
<div class="row">
<div class="col-md-6">
<div class="mt-5"></div>
<h2 class="h5 mb-2 pb-1">Upload file</h2>
<p class="mb-4 fs-sm">File types supported: PNG, JPEG, JPG. Max size: 1mb.</p>
<!-- invalid message -->
<div class="invalid-feedback invalidFileSize" style="display:none;">The maximum file is 1mb. Please reduce the file size or change the new file.</div>
<div class="invalid-feedback invalidFileType" style="display:none;">Only PNG, JPEG and JPG file type are acceptable. Please choose the new file type.</div>
<!-- Drag and drop file upload -->
<div class="file-drop-area">
<div class="file-drop-icon"><i class="fa-solid fa-cloud-arrow-up"></i></div>
<span class="file-drop-message">Drag and drop here to upload</span>
<input type="file" class="file-drop-input" accept=".png, .jpg, .jpeg">
<button type="button" class="file-drop-btn btn btn-primary btn-sm">Or select file</button>
<button type="button" class="btn btn-outline-secondary btn-sm remove-upload-btn">Remove</button>
</div>
<!-- Note -->
<div class="mt-5 text-muted">
<span><b>In this tutorial</b>, we want the users to view the uploaded image on the card design before saving.</span>
</div>
</div>
<!-- preview image section -->
<aside class="col-md-6 mt-0 text-center">
<div class="mt-5"></div>
<!-- preview image card -->
<div class="card border-0 shadow bg-light d-inline-block" style="width: 400px; height: 600px; pointer-events: none; border-radius: 50px;">
<div class="d-flex align-items-end justify-content-start w-100 h-100">
<!-- preview image -->
<img src="" alt="" class="position-absolute top-0 preview-image" style="display: none; border-radius: 50px; width: 400px; height: 600px; object-fit: cover;">
<!-- extra info -->
<div class="d-flex justify-content-between align-items-center mb-3 mx-5 mt-5 position-relative" style="z-index:100;">
<div class="d-inline-block w-50">
<span class="text-white bg-info bg-gradient rounded-pill p-2 preview-image-title"><i class="fa-solid fa-location-dot"></i> Krabi,Thailand</span>
</div>
<div class="d-inline-block text-end w-50">
<img src="img/person-dummy.jpg" alt="https://www.freepik.com/drobotdean" class="rounded-circle w-50 border border-info border-3">
</div>
</div>
</div>
</div>
</aside>
</div>
</div>
<!-- ### .preview-image-container | END ### -->
<!-- add our custom js -->
<script src="file-drag-drop.js"></script>
</body>
</html>In the code above, it is simply the HTML markup. We add Bootstrap5 and Font Awesome, which are third-party. We also add the style.css and file-drag-drop.js, where we will add the code in the next section.
Add Style.css
- Create the new style.css
- Add the code below to the style.css
.file-drop-area {
    position: relative;
    padding: 2rem 1rem;
    transition: border-color .15s ease-in-out,box-shadow .15s ease-in-out;
    border: 2px dashed #dae1e7;
    background-color: #fff;
    text-align: center;
    cursor: pointer;
}
.file-drop-area .file-drop-icon {
    display: block;
    margin-bottom: 0.75rem;
    color: #aeb4be;
    font-size: 1.625rem;
}
.file-drop-area .file-drop-message {
    display: block;
    font-size: .875rem;
    margin-bottom: 1.25rem;
}
.file-drop-area .file-drop-input {
    display: block;
    position: absolute;
    top: 0;
    left: 0;
    width: 100%;
    height: 100%;
    background-color: transparent;
    opacity: 0;
    outline: none;
    cursor: pointer;
    z-index: 2;
}
.file-drop-area .btn {
    position: relative;
    z-index: 3;
}
.file-drop-area .file-drop-preview {
    max-width: 16rem;
    margin-right: auto;
    margin-bottom: 0.75rem;
    margin-left: auto;
}
img, figure {
    max-width: 100%;
    height: auto;
    vertical-align: middle;
}
Add file-drag-drop.js
- Create a new file-drag-drop.js
- Copy the code below and paste it into the file-drag-drop.js
// ## custom drag and drop input field
var fileDropArea = function () {
    var dropArea = document.querySelectorAll('.file-drop-area');
    // a container of file drop area input field and preview image section
    var previewContainer = document.querySelectorAll('.preview-image-container');

    var chkAllDropArea = function chkAllDropArea(i) {
        let input = dropArea[i].querySelector('.file-drop-input'),
            message = dropArea[i].querySelector('.file-drop-message'),
            icon = dropArea[i].querySelector('.file-drop-icon'),
            selectButton = dropArea[i].querySelector('.file-drop-btn'),
            removeButton = dropArea[i].querySelector('.remove-upload-btn'),
            invalidFileSize = previewContainer[i].querySelector('.invalidFileSize'),
            invalidFileType = previewContainer[i].querySelector('.invalidFileType');

        message.innerHTML = "Drag and drop here to upload";

        selectButton.addEventListener('click', function () {
            input.click();
        });

        removeButton.addEventListener('click', function () {
            input.value = '';
            invalidFileSize.style.display = 'none';
            invalidFileType.style.display = 'none';
            message.innerHTML = "Drag and drop here to upload";

            // input file
            let fileDropPreview = previewContainer[i].querySelector('.file-drop-preview');
            if (fileDropPreview && fileDropPreview.querySelector("img")) {

                // remove the file drop icon
                fileDropPreview.querySelector("img").remove();
                fileDropPreview.className = "file-drop-icon";

                // add the upload icon
                const originIcon = document.createElement("i");
                originIcon.className = "fa-solid fa-cloud-arrow-up";
                icon.appendChild(originIcon);
            }

        });

        input.addEventListener('change', function () {
            // # preview image at the input file
            if (input.files && input.files[0] && ((input.files[0].type == "image/jpeg") || (input.files[0].type == "image/png"))) {
                var reader = new FileReader();

                reader.onload = function (e) {
                    var fileData = e.target.result;
                    var fileName = input.files[0].name;
                    message.innerHTML = fileName;

                    if (fileData.startsWith('data:image')) {
                        var image = new Image();
                        image.src = fileData;

                        image.onload = function () {
                            // CSS is already added in the style script
                            icon.className = 'file-drop-preview img-thumbnail rounded';
                            icon.innerHTML = '<img src="' + image.src + '" alt="' + fileName + '">';
                        };
                        // # Note: You can add the video and document file type using this code below as well.
                        // On the preview section, you must add your own custom code to make it work as you want.
                        // } else if (fileData.startsWith('data:video')) {
                        //     icon.innerHTML = '';
                        //     icon.className = '';
                        //     icon.className = 'file-drop-icon ci-video';
                        // } else {
                        //     icon.innerHTML = '';
                        //     icon.className = '';
                        //     icon.className = 'file-drop-icon ci-document';
                    }
                };

                reader.readAsDataURL(input.files[0]);
            }


            // # input field validation
            if (!input.files) { // This is VERY unlikely, browser support is near-universal
                console.error("This browser doesn't seem to support the `files` property of file inputs.");

            } else if (input.files[0]) {
                let file = input.files[0];

                // Check filesize is over 1 mb(1000000 bytes)
                if (file.size > 1000000) {
                    // show a warning message
                    invalidFileSize.style.display = "block";

                    // Check file type must be only PNG, JPEG and JPG
                } else if (!((file.type == "image/jpeg") || (file.type == "image/png"))) {
                    // show a warning message
                    invalidFileType.style.display = "block";

                } else {
                    // the file is all good

                    // hide a warning message
                    invalidFileSize.style.display = "none";
                    invalidFileType.style.display = "none";
                }
            }
        });
    };

    var previewImage = function previewImage(i) {
        // # preview image
        const uploadInput = previewContainer[i].querySelector('.file-drop-input');
        const previewImageElement = previewContainer[i].querySelector('.preview-image');

        uploadInput.addEventListener('change', function () {
            const [file] = uploadInput.files;

            if (file && ((file.type == "image/jpeg") || (file.type == "image/png"))) {
                previewImageElement.style.display = 'block';
                previewImageElement.src = URL.createObjectURL(file)
            }
        });

        // # remove preview image
        previewContainer[i].querySelector('.remove-upload-btn').addEventListener('click', function () {
            previewImageElement.src = '';
            previewImageElement.style.display = 'none';

        });
    }

    for (var i = 0; i < dropArea.length; i++) {
        chkAllDropArea(i);
        previewImage(i);
    }
}();
Uploaded Image Display
Now your file structure will look like this.
- index.html
- file-drag-drop.js
- style.css
For the dummy image, simply create an img folder and replace the placeholder image with your desired file. (You’ll find the specific image link referenced in the HTML code.) The complete code and all resources are available for download at the end of this post.
Let’s look at how the code implements the drag-and-drop field and the image preview.

Explanation
- File Selection: Users can select an image file or drag and drop the image file directly into the input area.
- File Validation: The uploaded file must be less than 1 MB and must be either a JPEG or PNG file only. We will display an error message if the file does not meet these conditions.
- File Removal: Users can remove the uploaded image by clicking the ‘remove’ button. This feature is essential because it allows users to clear the current input file without having to refresh the form, offering greater control.
- Code Duplication/Reusability: We wrap the input file and the preview section within the .preview-image-container div. This means you can duplicate this entire container to create new, independent file upload sections. The JavaScript code is designed to work automatically with any new duplicated container without requiring any changes.
Drop Area
1. Function Overview
The fileDropArea function serves as the central drag-and-drop file controller. It starts by searching the entire page for all input fields that have the file-drop-area class. After finding them, the function then loops through each one to set up the drag-and-drop listeners and display the image thumbnail preview.
2. Reading Files
To read the contents of the files locally and generate the thumbnail, the code uses the FileReader object. (You can find documentation and examples on how to use the FileReader object here.)
3. Important Note
Note: This tutorial is designed to work with image file types only. If you need to handle other types, such as video or document files, you will need to add custom code to support them.
Remove Button
When the user clicks on the remove button, we will reset the thumbnail and preview section.
Preview Section
We preview the image inside the card design to ensure visual consistency. In my project, this card design is utilized across many different components (such as grid layouts and carousels). The goal is to allow the user to choose the perfect image that fits the card’s dimensions and style independently.
Field Validation
We perform the following field validations:
- Check the uploaded file type
- Check the uploaded file size
Download Full Source Code
Did you find this tutorial helpful? You can show your support by buying me a coffee!
Please complete the form. Upon successful submission, the file download will begin automatically. Please allow a few seconds for the submission to complete.
Cartzilla Bootstrap Template
A portion of the code in this tutorial is adapted from the Cartzilla Bootstrap Template, which I’ve used extensively in my CraftCMS projects for several months. I highly recommend Cartzilla to anyone seeking a high-quality, production-ready template for any web project. It is well-coded, which significantly reduces development time and makes adding custom features seamless. Plus, the template support is quick and very helpful. If you choose to purchase Cartzilla using my affiliate link in this post, you’ll be directly supporting the creation of more useful content like this!
Wrap Up
The Drag and Drop with preview image feature is essential for modern web applications. I strongly recommend implementing this functionality for any file upload input—it significantly enhances the user experience.
Did you find this tutorial helpful? You can show your support by buying me a coffee. Your contribution truly makes my day and encourages more useful content!
Your support helps keep this blog running! Secure payments via Paypal and Stripe.

