Today, I got a request from my client to fix his website. The issue is, sometime the website shows a lock icon at address bar at the browser which means a secure site(SSL certificate installed). But sometimes the same page shows the “Not secure” message at the address bar.
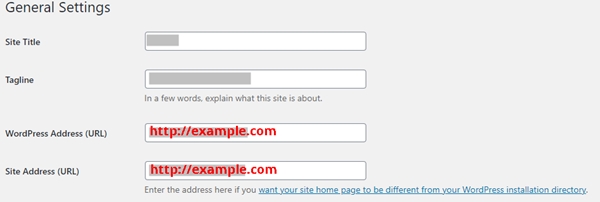
The reason is, there is a mix “http://” and “https://” in the content. Also, I check the WordPress address(URL) and site address(URL) at “Settings>General Settings” at the WP admin. The URL is set with “http://“. In this post, I am gonna share with you how I solve it.
Check SSL certificate
Before changing the URL, it would be good to check SSL certificate first. You can go to SSL checker and enter your domain name for checking. If SSL certificate is installed correctly, the result should show all green color on the SSL checker website.
Backup the database
We will make the changes in the database. Before do anything, we should backup the database first. If you can access cPanel, you can go to PHPmyAdmin tool and export the database from there. Or you can install the UpdraftPlus WordPress Backup plugin then create the database backup and download the database backup file to your computer. Both options will create the sql extension file for you such as db.sql.
Add HTTPS to WordPress admin
To avoid the new content with “http://” added, we will secure our WordPress admin with “https://”. To do that, we will add one line below before where it says “That’s all, stop editing!” in wp-config.php.
define(‘FORCE_SSL_ADMIN’,true);
Now, login to your WordPress site with “https://”. For example, “https://example.com/wp-admin“. Once the login is successful, you can access WP admin with “https://” at the browser. It means your WP admin is secure. When other users login and add the new internal links from your site, the URL will be “https://”.
Update WordPress address and Site address
Next, we will update the WordPress and Site URL at Settings menu at the WP admin. So at the WP admin, navigate to Settings then General. You will see the page as below

Change the “http://” to “https://” at WordPress Address and Site Address. Then hits “Save Changes” button. You will automatically logout because the URL is changed. Now login in to WP admin again with “https://”. For example, “https://example.com”. You should access to WP admin without any issue.
If somethings go wrong, you will use the backup database file and restore back. Then changes the WordPress and site URL again.
Change the links in the content
Next, we will replace all HTTP links to HTTPS links. I will use a Better Search and Replace plugin. Go ahead, install this plugin and activate it. At the select tables field, you can select all tables or specific table. I select all. Once you click on “Run Search/Replace” button. All links you choose to change will be made in the database.
Next, navigate to Settings then Permalinks and just hits “Save Changes” button. This just flushes all URLs.
Add 301 Redirect
Next, we want to redirect all HTTP to HTTPS permanently. If you cPanel has an option for 301 redirect, you can use that option. Or you can find the plugins to help you with. You can try a 301 Redirects – Easy Redirect Manager plugin.
Test your site with SSL Tester
Now it is time to test your site. You can go to SSL Labs. It will show how well your SSL implement is on your site. Finally, check all URLs with SSL check. This SSL check will show the non-secure content left on your site. So you can go back and manually change that content.
Update other tools you have with HTTP
It is a good idea to update your sitemap, adding the site to Google Search Console, updating CDN and Google Analytic. So we update everything that involves the HTTP. We make sure we update HTTP to HTTPS.
Conclusion
When you setup the domain and WordPress site at the first time, you want to make sure you have SSL certificate installed for your site before continue adding the content. If you do, don’t see to go through all steps above.
But some cases, you may work for other websites that you don’t build or you have your website with HTTP for long time and now you want to change to HTTPS. So you follow these steps.
The most important part I mention is creating the database backup file. Without the database backup file, your site may break and can not revert back.


