Your support helps keep this blog running! Secure payments via Paypal and Stripe.
Last week, I had a request from my client to transfer the domain as well as all email accounts from GoDaddy to the new host provider. The email accounts are set at the workspace email. In order to transfer the email accounts including the calendar data, I need to export the email accounts and calendar data manually. You need to export the emails and calendar data before transferring the domain.
Export the emails and email messages
For exporting the email accounts, I will show you two ways to do it.
- Export the emails with MailStore Home
- Export the emails with MS Outlook 2013 (The concept should be similar to the newest MS Outlook version)
Export the emails with MailStore Home
# Set up GoDaddy emails to MailStore Home
Before exporting, we need to set up the email accounts in the MailStore Home first.
Note that, MailStore Home is a free version with a limit.
Download and Install
Download the MailStore Home Free version at this link. Then install it on your computer.
For GoDaddy, you can simply add your email account to the MailStore Home following the steps below.
- At the MailStore home, click on “Archive E-mail“
- On the “Archive E-mail” page, under “E-mail Account” section, click on “Advanced” button
- Select “IMAP Mailbox” then you will see the popup
- On the “Archive IMAP Mailbox” popup, enter the required information. You can find the required information from GoDaddy>Workspace email>Email Setup Center on each email account. The Host information is the incoming server(IMAP).
- E-mail Address: Your email address
- Host: imap.secureserver.net
- Access via: IMAP-TLS
- User Name: Your email address
- Password: Your email password
- Then click on the “Test” button
- Next, click on the “Next” button
- Finally, you will see the screen below

- Click on the “Finish” button then you will see the success message
- Once you see the new “Profile Name” in the Profiles section, click on the “Run” button on the “Current Status” section at the right side box
- Once the archiving process is done, you will see the updated last execution date and last result status next to your profile name
- You can check all archived emails that you set up at the Archive left side box.

Note that with the IMAP mailbox, you will get all the folders that you create from the workspace email on your email account. If the folder is empty, the folder won’t sync to MailStore Home. You don’t see the empty folder in MailStore Home.
Tips you can create a shortcut to run an archiving profile on your desktop. This way, you can start archiving from the selected archiving profile without opening the MailStore Home application.
# Export the archived emails and import them to your new host provider
Assume that you already created the email accounts on the new host provider and you know their email setup.
The exporting steps are below:
- Start MailStore Home
- Click on Export E-mail
- Then click on IMAP Mailbox under “E-mail Servers” section
- You will see the Export to IMAP Mailbox popup
- Fill in the email configuration that you create in the new host provider. Then hits on the Test button for a test connection.
- Once the test is complete then click on Next button
- MailStore will create a folder in your IMAP mailbox and export your messages there.

More different methods of exporting can be found here.
Export the emails with MS Outlook 2013
# Set up GoDaddy emails to MS Outlook 2013
The setups are below.
- Open MS Outlook 2013 application
- At the top bar, choose File
- On the Info page, click on “Add Account” button
- Choose “Manual setup or additional server types” then click “Next”
- Choose “POP or IMAP”
- Enter the required information on the popup as shows below
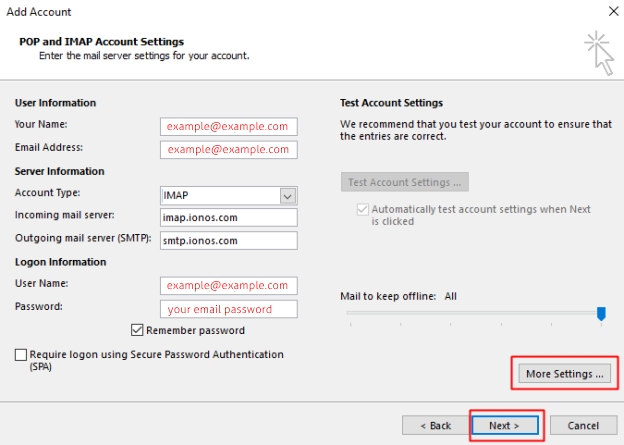
- Account Type should be set as IMAP
- After you enter all the required information, click on “More Settings …”
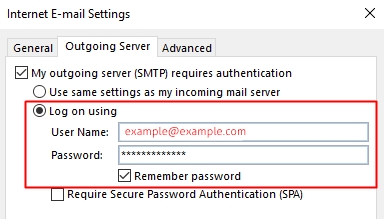
- On the Internet E-mail Settings popup at the Outgoing Server tab, click on “My outgoing server (SMTP) requires authentication” then choose “Log on using” and enter your email user name and password
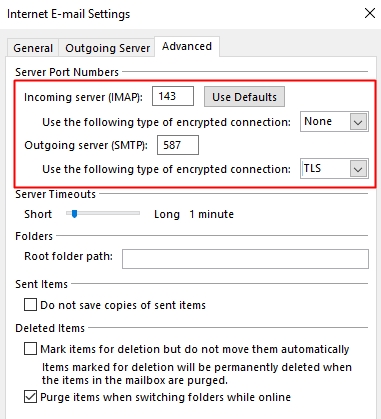
- At the Advanced tab, enter the information below
- Incoming server (IMAP): 143 (993 for SSL)
- Outgoing server (SMTP): 3535 or 25 or 80 (465 or 587 for SSL)
- For GoDaddy, the SMTP port will be 3535 and 465 for SSL. For other hosts, you may find other port numbers. You must check the email setup instruction.
- Then click on the “OK” button
- You may ask to enter the email password for the following server that you just set up above.
- After that, MS Outlook will test the logon and send out the message. If you get the error message on sending out the message, you should check the SMTP setting by changing the port from 3535 or 25 or 80 for none SSL.

- Once the testing is successful you will click on the Finish button.
Now MS Outlook will sync all email messages from GoDaddy workspace email.
# Export the emails and Import them to your new host provider
Export
We will export the file as the PST file type. The steps are below.
- Launch Outlook
- Choose File at the top bar
- Choose Open & Export and click on Import/Export
- Choose Export to a file
- Click Outlook Data File (.pst) and then click Next
- Select the email account to export. Only information for one account can be exported at a time.
- Make sure that the Include subfolders are selected.
- Click Browse to select the destination path for storing the PST file then click OK
- Click Finish
Import
- Launch Outlook
- Choose File at the top bar
- Choose Open & Export and click on Import/Export
- Choose Import from another program of file then click Next
- Choose Outlook Data File (.pst) then click Next
- Browse your export file(.pst) that you export earlier then click Next
- Choose Outlook Data File to export everything or choose only the specific folder you want to export. Make sure you trick on Include subfolders and Import items into the same folder in: select your email account you want to import to.
- In order to import, you will enter the email password and then hits OK

Once the import is done, you should see all email messages and all custom folders in your MS Outlook.
Note that, you can do the import and export from the same MS Outlook. Even though the email account is the same but the mail server is not the same. For example, you set up the example@example.com from GoDaddy mail server then you export the email message from example@example.com as PST file from MS Outlook. Then you transfer your domain name to a new host provider. Next, you set up the example@example.com from your new host provider mail server then you import the PST file into the same MS Outlook. Now in your MS Outlook, you will see example@example.com and example@example.com (1). You will notice the old example@example.com that you set up from GoDaddy mail server doesn’t sync anymore because you transferred the domain to the new host provider already. Instead, the example@example.com (1) that you set up from your new host provider does sync.
Export the calendar data from the workspace email
Workspace email offers the calendar feature. If you use the calendar and want to migrate it to the new host provider, you can follow the steps below.
- Log in to your GoDaddy account
- Navigate to My Product
- At the Workspace Email, click on Manage All
- Hover your email account you will see the popup menu, click on “Launch Calendar“
- Once the calendar page opens, click on “Settings” then click on “Import/Export”
- Choose the calendar you want to export. It can export one at a time. The export file is an ics file type such as my_personal.ics
- That’s it
With the ics file type, you can import the calendar into your new host provider. If you use the MS Outlook you can follow the steps below.
- Launch Outlook
- Choose File at the top bar
- Choose Open & Export and click on Import/Export
- Choose Import and iCalendar (.ics) or vCalendar file (.vcs)
- Browse the ics file
- MS Outlook will ask you option for Open as New or Import I choose to import
Once the calendar import is done, you should see your calendar data on your calendar.
Your support helps keep this blog running! Secure payments via Paypal and Stripe.
